Visualizzazione post con etichetta Android. Mostra tutti i post

lunedì 19 novembre 2018

TWRP Installation on Asus Nexus 7 3g (2012), tilapia.

The following applies to the Asus Nexus 7 3g 2012, "tilapia" model, but I suppose that the procedure is the same for the "grouper"--WiFi only--model.
My Nexus 7 had only official Asus updates (Asus Lollipop Android), non-rooted.
Front view of Nexus 7 (cropped).png

The "recovery" is a boot-time utility useful for OS installation, and performing OS backups.

I used my Linux PC but I think that this procedure applies also to Windows and iOS, only with minor changes.

If you broke your Nexus 7 following this guide it's your fault, not mine.. I'm not responsible in any way. This procedure worked for me but software is too much complex for 100% confidence.

Installing TWRP recovery

You need Android-SDK installed on your PC, and for Windows you need also Andorid USB drivers.

In case your Nexus fastboot is locked (normal situation) the following operation is going to delete the user data on your Nexus 7.. backup, backup, backup.

Download TWRP (for "tilapia") image on your PC from https://twrp.me/asus/asusnexus720123g.html (TWRP for  WiFi only "grouper" is here https://twrp.me/asus/asusnexus72012wifi.html), let's download the twrp-3.x.x.x-tilapia.img file on your PC-- there are also apk packages, let's ignore them.


With your Nexus 7 Tablet on, enable USB Debugging: Settings > Developer Options > USB Debugging.
Sometimes, you have to enable Developer Options first:
  1. Go to "Settings".
  2. tap on "About phone" or "About tablet" entry,
  3. Scroll down to the bottom of the "About pho☺ne" and locate the "Build Number" field
  4. tap 7 times on "Build Number"
Connect the tablet to your PC with USB cable, reboot to the bootloader using this command from your PC (adb and fastboot are commands installed with Android-SDK):

adb reboot bootloader

Please note that you need to authorize debugging from your PC when performing the previous command.
(Optional: you can also perform this operation manually, the procedure is described later)

Then, unlock the fastboot (this operation invalidates the Nexus guarantee. :-) ):

fastboot oem unlock

A confirmation screen appears on the Nexus  7 screen, you have to select Yes and click "Enter" that is the Power button :-)

Then install the TWRP recovery:

fastboot flash recovery twrp-3.x.x.x-tilapia.img

Now, you have to reboot into recovery immediately in order to persist the change, you  can reboot the device from the bootloader menu or with the command fastboot reboot.
During the reboot, you have to be very quick in order to access the bootloader again and perform immediately (manual way to enter the bootloader):
  • press and hold the Power key, and the Volume Down key. 
  • You are again in the bootloader, scroll down twice to select Recovery
  • Select with the power key.
  • you are in TWRP:
Image result for twrp
Begin "Please Note"
there are lot of ways to perform the same operations. For example you can reboot in the bootloader with the command: fastboot reboot bootloader.
Perhaps you can also try:  fastboot reboot recovery
But I simply described the operations I performed.

End "Please Note"

Now you are running TWRP, I suggest to use TWRP to perform these operations:
  • backup the original Asus Android OS (I put buckups into the Nexus /data/media/0/Download/ folder)
  • use the adp pull (google is your friend) command to transfer the backup from /data/media/0/Download/ to your (USB connected) PC
  • Perform a factory reset (TWRP Wipe)
  • ..and finally install (Install button) a new preferred Andorid release for tilapia devices

In order to install a new Android version you have to copy the Android OS image, optional: gapps zip package, optional fix packages and rooting packages in the Nexus SD or internal storage (I usually use /data/media/0/Download/ folder). When running TWRP, the Nexus (connected with USB) is accessible by PC with the adb command or,hopefully ,like USB storage (or MTP).

In detail, I suggest to install the Android AOSP 7.x.x AndDiSa release (xda thread with instructions):

https://forum.xda-developers.com/nexus-7/development/rom-android-7-aosp-grouper-t3467514

Please note: for the proposed SetupWizardFixCrDroidNexus7.zip fix was mandatory, I think you need to use it too.

Have fun,

Quoting my "success post":

I have successfully installed the aosp_tilapia-7.1.2-ota-eng-20181112.ds.zip on my Asus Nexus 3g 2012 (tilapia), I also installed open_gapps-arm-7.1-pico and Magisk v17.3.
I installed your Android release, by using TWRP-3.2.3-0-tilapia, over the Asus original fully updated Lollipop. In fact the most tricky part was installing TWRP

During installation the initial OS configuration failed, multiple times (I tried with reboots), just during the user account selection. Using the suggested SetupWizardFixCrDroidNexus7.zip fix, fixed the problem, and I was able to complete the device configuration.

Finally:
My Nexus is back to life, is very responsive, browsing and playing movies are very fast...
I have not tried all the functions (not tried camera yet).

With official Lollipop my Nexus was simply unusable, u-n-u-s-a-b-l-e, I used to think that my beloved Nexus was simply too old for the new applications. I think now that Asus(or Google, it is a Nexus device) released defective OS versions for manufacturer-planned-obsolescence

lunedì 15 gennaio 2018

How to install TWRP (and LineageOS) with Samsung S5 (G900F)


I tried following the official LineageOS installation guide here, for klte (G900F) model, but the described procedure doesn't work (always).

If you broke your phone following my tips, it's your fault, not mine.. I'm not responsible in any way. Read all the linked resources first.

I'm not going to copy&paste here the official LineageOS installation guide, please refer to the LineageOS site for the complete procedure, I'll only fix the wrong parts. I have verified these steps with my Samsung S5 (G900F) phone, with a fully updated Android Marshmallow from Samsung.
Let's fix the wrong part, the TWRP installation:


The TWRP installation - the right way


The official guide tells you to use the heimdall opensource tool in order to flash the new recovery, TWRP. Forgot it and let's use the Odin software for Windows instead of heimdall. Odin is the official Samsung tool for flashing/managing the firmwares.
You can find it here on the xda forums.


If you have already installed Windows Samsung software.. like Smart-Switch you should have all the needed drivers for the Samsung phone. You can also use the Smart-Switch software to do a full backup... that is not a bad idea...

DO BACKUPS, DO BACKUPS.. Cloud or Local
Google for it 

Then:
  1. Download the TWRP tar image for S5 klte into your Windows PC
  2. Activate the Android phone USB debugging mode (please Google about it)
  3. Connect the phone with a USB cable to your Windows PC
  4. Press the Volume Down+Home+Power buttons altogether, then confirm in order to enter the Download Mode.
  5. Open the ODIN application
  6. The phone may be detected and a confirmation brief message appears in the log tab (OK+something)
  7. In the AP field select the downloaded TWRP .tar file
  8. Select only the 'Reset Time' checkbox in the Odin Options tab (Re-partition is DANGEROUS and should be unchecked! And also the other checkboxes should be unchecked)
  9. Press the START button and the recovery will be flashed
  10. Reboot into TWRP recovery by pressing at the same time the phone buttons Volume UP+Home+Power
Full instructions: http://www.droidviews.com/install-twrp-recovery-samsung-galaxy-s5/

After TWRP installation you can follow the official instructions in order to install LineageOS.
Have fun

P.S:
With S5 you need to uncheck Odin "Automatic Reboot" checkbox.
This is needed because the automatic reboot replaces the TWRP with the original Samsung recovery.. you need to manually boot in TWRP at least once in order preserve it right.

martedì 4 gennaio 2011

Recensione, LG Optimus One P500 (Black)

Per un elenco delle caratteristiche del p500 si rimanda ai siti specializzati o alle recensioni serie.


Prime considerazioni

  • Esteticamente semplice ma bello e dall'aspetto robusto
  • la gommatura della scocca assicura una presa sicura sul cellulare
  • Il display 3,2'' (TFT, non è AMOLED) è luminoso; bello
  • 512 Mega di memoria del cellulare, permettono di installare un sacco di applicativi
  • La CPU (semplice ARM11 a 600Mhz) fa il suo lavoro (es: non noto impuntamenti dell'interfaccia)
  • Android Froyo 2.2 con promessa di aggiornamento al 2.3
  • Il media player preinstallato, riproduce anche divx (avi mpeg4), fluidi senza scatti

Importante


Non comperate versioni dell'Optimus One diverse dalla Black, gli Optimus One di altre colorazioni non hanno la scocca gommata ma sono in plastichetta; garantisco l'effetto "ovetto Kinder", poco eleganti.
La gommatura opaca del Black regala al cellulare tutta un altra personalità.


Piccoli diffettucci


LG Home's crash

"LG Home " è un applicativo incluso e molto carino che organizza il pannello delle applicazioni in modo pratico, permettendo di creare categorie per applicativi. Molto raramente va in crash (non crea problemi perché viene subito riavviato ma l'errore viene visualizzato).
Update: ultimamente non mi è più successo, forse l'aggiornamento di qualche altro applicativo ha risolto il problema?

Market confuso


Il cell arriva con alcune applicazioni preinstallate, Gmail, Netlog, Maps..., purtroppo il Market è un pelo inconsistente quando si tratta di lavorare con queste applicazioni presenti in ROM.
Mi spiego, nel caso fosse presente un aggiornamento non le mette in evidenza come aggiornabili ma cercando l'applicativo nel market e cliccando direttamente sull'applicativo, allora appare magicamente l'opzione di aggiornamento; dopo il primo aggiornamento il market le tratta normalmente.
Alcune ma fortunatamente poche inutili applicazioni, come Netlog, pur essendo presenti risultano non installate per il Market  che quindi preferirebbe installarle da zero (mi sono astenuto).


Dubbio sugli update


Riguardo gli update per il SO Android non mi è ancora chiaro come sia gestita la cosa da LG..
Da quanto mi è dato capire bisogna eseguire un applicativo chiamato "notifica di aggiornamenti"; una volta eseguito esso mi informa che il firmware è aggiornato ma mi lascia con un messaggio ambiguo:
"Se si desidera aggiornare il firmware, connettere il dispositivo al PC con il cavo e aprire PCSuite".
Questo messaggio mi instilla l'atroce dubbio che gli update non vengano gestiti automaticamente dal cell come ci si aspetterebbe (o forse ero ben abituato da HTC).
Comunque questo resta solo un sospetto di pecca fino all'arrivo del primo update a quel punto capirò se collegarlo al PC è obbligatorio o meno.


LG Optimus One (Black) vs HTC Legend


Una comparativa diretta con il mio fedele Legend mi sembra obbligatoria.

Costo (+1 LG)

8 mesi fa il Legend mi era costato 399 euro, pochi giorni fa Optimus One è costato 229 euro.


Scocca (+1 HTC)

Entrambi molto belli, certo che il case completamente metallico e il display in cristallo del Legend rendono il cellulare HTC un signore di eleganza e robustezza.
Per contro il Legend è estremamente scivoloso mentre l'Optimus grazie alla scocca gommata garantisce sempre una presa salda.


Display (+1 HTC)

Entrambi 3,2'' stessa risoluzione, 16M colori Amoled per Legend, 256K TFT per Optimus. 
Presi singolarmente non ho notato una grossa differenza nei colori o nella luminosità dei due display. 
Mettendoli vicino ci si rende conto che il display del Legend  è più "qualcosa" (forse è dovuto anche al cristallo).
Quindi un vantaggio per il Legend ma anche lo schermo dell'Optimus è molto bello.


Performance (+1 LG)

Entrambi gli smartphone montano una CPU ARM11 a 600Mhz, sono perfettamente equivalenti. 
Su entrambi gira il fidato Android Froyo e nell'uso non ho notato impuntamenti dell'interfaccia.
Per quanto riguarda la memoria il Legend ha solo 384MB di RAM contro i 512MB dell'Optimus: La differenza si sente non tanto nella velocità quanto per lo spazio disponibile; con il Legend mi trovo spesso a valutare quali applicativi mettere e quali togliere, con l'LG Optimus non mi sono ancora trovato nella situazione di preoccuparmi. LG Optimus = memoria no pensiero.
Sul lato del 3D entrambi usano Arduino, ma il chip dell'LG Optimus è l'Arduino 200 un pelo meglio.. un pelo.
P.s: con Froyo è possibile spostare gli applicativi su SD ma ho sentito che questo porta ad un notevole rallentamento delle applicazioni, è quindi saggio, se possibile, evitare.


GPS (+1 LG)

I due cellulari sono praticamente identici e hanno entrambi il GPS integrato. Quello dell'Optimus è più veloce nella ricerca ed è capace di funzionare con un segnale più basso; vicino alla finestra del salotto il GPS del Legend non risusciva a determinare la posizione mentre l'Optimus è riuscito a determinarla. 


Camera e Flash (+1 HTC)

HTC Legend 5 Mpixel (con Flash) vs LG Optimus One 3.2 Mpixel (senza Flash); la mancanza del Flash è forse l'unica cosa che mi infastidisce, i 5 Mpixel  del Legend non garantiscono in se foto migliori dell'Optimus One dato che le ottiche del Legend non sono eccezionali. Direi che ad un livello di camera il confronto finisce in patta, ma l'assenza di flash non si può perdonare.

Software e personalizzazioni (+1 HTC)

E qui HTC spacca tutti:
Non mi ero mai accorto di quanto curati e completi fossero gli applicativi e i widget HTC Sense prima di confrontarli con quelli standard di Android.
Complessivamente le funzionalità sono le stesse, ma il sense di HTC ha una eleganza, una cura per i dettagli che fa la differenza. Sense è stilosissimo.
Usando Sense si ha anche l'impressione che gli applicativi siano meglio integrati ma qui naturalmente devo mettere in conto che lo uso da un anno mentre l'LG Optimus lo uso solo da pochi giorni.

LG reagisce:
Con l'Optimus si può rimediare facilmente e aumentare il livello di "eleganza" installando widget di terze parti (già fatto ;-) ); 

Un punto a favore di Optimus è la sintesi vocale, eSpeak sul Legend non riesce a caricare dei dati vocali (problemi con il Market?) decenti e la lettura è molto stile anni 80. Su Optimus invece la sintesi vocale funziona meglio e la lettura è molto più "umana".

Una lode per LG che ha integrato un player di default capace di leggere avi e divx (ed è estremamente veloce, i filmati sono sempre fluidi) mentre il player fornito da HTC legge ad esempio mp4 ma non piglia mkv e avi (si deve installare arcMedia).

La promessa di update di Optimus a Andorid 2.3 è un punto a favore di LG, per quanto non penso vi siano vantaggi enormi rispetto all' Andorid 2.2.

LG segna piccoli punti a suo favore ma la bellezza del Sense di HTC è troppo troppa.

La tastiera LG è molto carina, bisogna però entrare nelle impostazioni per abilitare la modalità qwerty e i comandi vocali (perché non sono abilitati di default??). Con questi accorgimenti la tastiera LG diventa carina quanto la tastiera HTC.

Concludendo

L'LG Optimus One P500 pur mancando di qualche finitura è un affare, uno smartphone che ha tutto ad un prezzo abbordabile.

sabato 20 novembre 2010

HTC Legend, converting a movie in a playable format with AVIdemux

HTC Legend' s default media player supports a limited set of formats and containers:

HTC Legend
Audio supported formats: Video supported formats:
Playback: .aac, .amr, .ogg, .m4a, .mid, .mp3, .wav, .wma     Playback: .3gp, .3g2, .mp4, .wmv
Recording: .amr Recording: .3gp   

Installing arcMedia video player (it is free and is available from Market) is the quickest way to play AVI or MKV's videos but decoding high-res DivXs is an hard task for your beloved Legend.
In order to achive a smooth playback you should try this:
  • Convert the movie into a format suitable by default player (it looks very optimized)
  • Reduce the movie's resolution
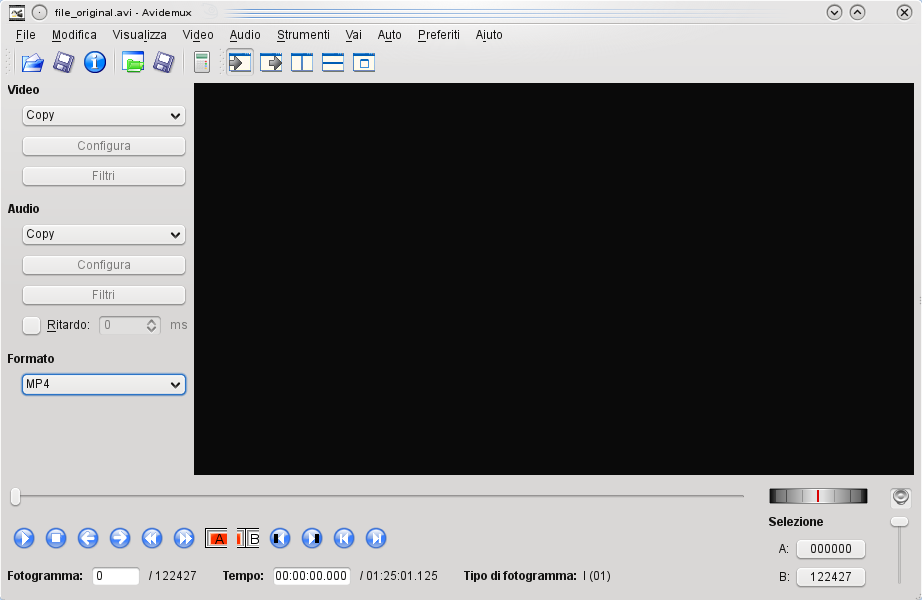
You need a video editor and I suggest AVidemux because it makes the job done, it is simple and is multi platform (Windows/Linux both).You should perform these operations:
  1. Install and execute AVIDemux video editor on your PC
  2. Click on File menu
  3. Click Open and select the original movie file
  4. Set MP4 as the Video Format for the output container (main window, at the bottom)
  5. Change the Video codec option from Copy  to MPEG4-ASP (I prefer lavc codec)
  6. Click into the video configuration options (configure, the button beneath)
  7. Change "Enconding Mode" to "Constant bitrate" and set a 250Kbps target bitrate.
  8. Click OK to close video configuration window
  9. Click into the video filter options (the button beneath)
  10. Add a Transformation->Resize filter by double clicking on it
  11. Set a resolution which doesn't exceed the Legend screen  resolution(480x320)
  12. Click OK twice in order to close the filter's window
  13. Change the Audio codec option from Copy to AAC (faac) 
  14. Click into the audio filter options (configure, the button beneath)
  15. Set audio bitrate to 128Kbps bitrate.
  16. Click OK to close video configuration window.
  17. Click on File menu
  18. Save the destination file with a desired name (starts video conversion)
  19. Connect the phone to your PC as an USB storage device
  20. Copy the movie to the Video folder of your mobile device
  21. Unmount the phone USB Storage
The movie's conversion usually takes 20 minutes on modern hardware and the obtained file is about 300MBytes for 2 hour video; it fits comfortably into your SD and is compatible with the efficient default video player.

4) container changed to MP4
11) Resize filter's panel

16) Al settings are done.. ready to start conversion!!


Suggestions

In case movie's audio volume is low, I suggest setting the automated gain inside the audio filters panel. This will amplify the movie's sound.
My Android's phone performing "How To Murder Your Wife", you should see it!!
Perhaps this guide is useful for other old Android phones but you have to check for your phone's resolution and supported codec/containers and adapt this guide a bit(or you can simply try).

Have fun ;-)

P.s: I know.. my english sucks. I'm sorry.

mercoledì 4 agosto 2010

Applicazioni Android consigliate


Sono un felice possessore di uno smartphone HTC Legend e dopo qualche mese di utilizzo ritengo utile pubblicare un elenco delle applicazioni Android meritevoli di occupare i sacri byte della mia cellulare memoria;

Le trovate sul Market e sono tutte rigorosamente gratuite ;-)

Utilità

EStrongs File Explorer

Pratico file manager, permette di accedere anche alle condivisioni di file e stampanti presenti nella LAN e accedere a server FTP. Ha dei moduli aggiuntivi che aggiungono la funzione di task manager, personalmente non li ho installati.

VNC per Android (AndroidVNC team+antlersoft)

Client VNC ben fatto. Offre la possibilità di accedere ai PC remoti via VNC.

No Lock (BoD)

Permette di disabilitare il blocco del cellulare (il movimento verso il basso o verso destra sul touchscreen).
Ho trovato questa funzione molto utile; prima di installare questa applicazione ero costretto ad utilizzare sempre il tasto di sblocco (che funge anche da accensione/spegnimento), posto superiormente al mio HTC Legend, per accendere lo schermo ed usare il cellulare.
Siccome questa operazione viene ripetuta moltissime volte al giorno, per leggere le mail etc, etc.. temevo che alla lunga avrebbe portato ad una usura e rottura del tasto (un tasto parecchio importante) .
No Lock permette quindi di rimuovere il blocco del cellulare e permette di sbloccare e accendere lo schermo utilizzando un qualsiasi tasto del cellulare (distribuiamo l'usura!).

NetMeter

Utile per monitorare l'andamento del traffico durante la giornata con tanto di grafico. Da usare per studiare il traffico generato dal cellulare.

NetCounter

Per evitare di sforare i limiti mensili di banda questa applicazione permette di registrare le statistiche sul traffico dati sulla rete dell'operatore, e separatamente, sul traffico wifi.
Non usate un applicativo chiamato NetTraffic, (al momento) esso sbaglia alla grande le stime sul traffico generato sulla rete dati dell'operatore; sembrerebbe l'applicativo più completo ma spero che risolvano questo bug quanto prima.

ipconfig

Fa quello che dice, gli utenti Linux sanno.

WiFi Buddy

Permette di impoostare un sacco di settaggi di fino sul funzionamento del wireless.
Il mio HTC Legend quando mandava in standby lo schermo spegneva pure il WiFi, e pur trovandomi all'interno della mia wireless domestica o al lavoro le applicazioni utilizzavano la connessione dati dell'operatore per le loro sincronizzazioni.
Con WiFi Buddy potete settare Android in modo che non spenga il WiFi allo standby, risparmiando quindi preziosi bytes tariffati.

ConnectBot

Terminale, accedere ad una shell ssh da cellulare è un atto che vi nobiliterà.

CIDR Calculator

Permette di convertire i range di IP e le netmask tra formati diversi.
Es: 192.168.0.0/24 corrisponde alla netmask 255.255.255.0

Droid48

Emulatore di HP48, chi l'ha usata ritroverà i piaceri del calcolo RPN (notazione polacca inversa).
A coloro che considerano l'RPN alla stregua di un latex delle calcolatrici rispondo: esso è molto di più.
Non avrete altra calcolatrice al di fuori di questa.

Barcode Scanner (ZXIng Team)

Legge i QR e i barcode, per chi non ha mai usato questi applicativi le prime volte sa di magia.

Gesture Search

Basta usare le tastiere, qeusta divertente applicazione permette di cercare all'interno del cellulare delle risorse scrivendo il nome dell'applicativo o del contatto sul touchscreen come se il dito fosse una penna.

Ricerca vocale (Google Inc.)

L'oracolo esiste e si chiama Google.
Recatevi dall'uno che è molti (server) e penitenti ponete i vostri quesiti , se la voce sarà ferma e lo spirito saldo otterrete le risposte.

Multimedia

MortPlayerMusic

Molto simile al player standard di Android ma permette di cercare e organizzare le canzoni per nome file e cartelle invece che attraverso le classificazioni derivate dai tag. Trovo l'accesso diretto ai files molto più affidabile e rassicurante.

yxflash

L'unico player che fa vedere i divx, è a pagamento ma il trial non finisce mai.

Shazam

Il tuo cellulare ascolta una canzone e ti dice il nome, l'album e l'autore. Da restare basiti.


Comunicazione e Social Network

Fring

Non ha bisogno di presentazioni un buon VOIP ora con video chiamate, peccato che non può più accedere alla rete Skype.

Google Buzz widget

Se usate i Buzz di google questo applicativo è molto comodo per effettuare i buzz al volo aggiungendo foto appena scattate o da archivio e se gradite aggiungendo pure la geolocation.

Varie


Google Maps
E' maps

Google Sky Map

Da adolescente passavo delle notti intere con l'atlante del cielo in cerca di stelle e costellazioni, faticavo parecchio a trovarle. Non avevo neanche un telescopio ma solo un binocolo veramente poco potente e che senza montatura era di pochissimo aiuto.
Il fascino della scoperta! Come ci si esaltava per aver scovato un corpo dalla bassa magnitudo.

Bene questo applicativo sovrannaturale spazzerà via tutto questo; rilevata la vostra posizione e forte della bussola integrata e degli accelerometri del cellulare esso vi mostrerà sullo schermo una mappa della porzione di cielo che state puntando, indicandovi i nomi delle costellazioni e delle stelle.
Il cielo in una mano.

Google Googles

Fotografate qualcosa e lui, se può, vi dice cosa è.
Funziona bene su poche cose, non funziona con volti e funziona male con i prodotti. Ma è molto divertente.

Giochi
e divertenti

Radiant Lite

Un retrogame divertente. Spara anche tu agli alieni pixellosi!

Tricorder

Se non lo installate verrete assimilati... "Enterprise, tiratemi su!"

The Schwartz Unsheathed (Sheff's Blend)

Dopo una attenta selezione, secondo me, la migliore spada laser in circolazione (considerazione basata soprattutto su come reagisce ai movimenti della mano).
La forza scorre forte nel vostro cellulare.